Deploying a static website via GitLab CI/CD and Docker to the remote VPS

Principal Software Engineer at FWD.hr. FOSS enthusiast. Learning every day :)
We’ve all been there - you have your perfect website ready, you bought that awesome domain name and your VPS is ready to host it, but you have no idea how to put it out there in the world… Hopefully this guide will help you out with this common issue most of us faced at some point.
Prerequisites
To follow this guide you should have the following prerequisites:
domain name
VPS server
git knowledge
basic knowledge of GitLab CI/CD
basic knowledge of Docker/docker-compose
static (HTML) website
Even if you don’t know what Docker and docker-compose are, you can still follow the guide since deep knowledge of the two is not required and I’m confident that you will be able to complete our goal.
1. Pointing your domain to your VPS
Your VPS will store your website on its storage drive, but how do you reach your VPS by using your domain when your VPS only has a public IP address? DNS to the rescue. Your VPS hosting provider “equipped” you with its own DNS resolver - a handy tool that will help us connect your domain and your VPS server. On the other side, your domain registrar allows you to use custom nameservers. Nameservers will tell your domain where to look for a DNS resolver that will then resolve your domain to the target server’s public IP address - your own VPS. In this example, I will be using InterServer as my VPS provider (with Ubuntu 20.04 installed) and the configuration that I will show will reflect their nameservers/DNS resolver.
First fire up your domain registrar dashboard for the domain that you want to use. Somewhere in the settings, you should find something similar to the picture below (depends on the registrar you are using).
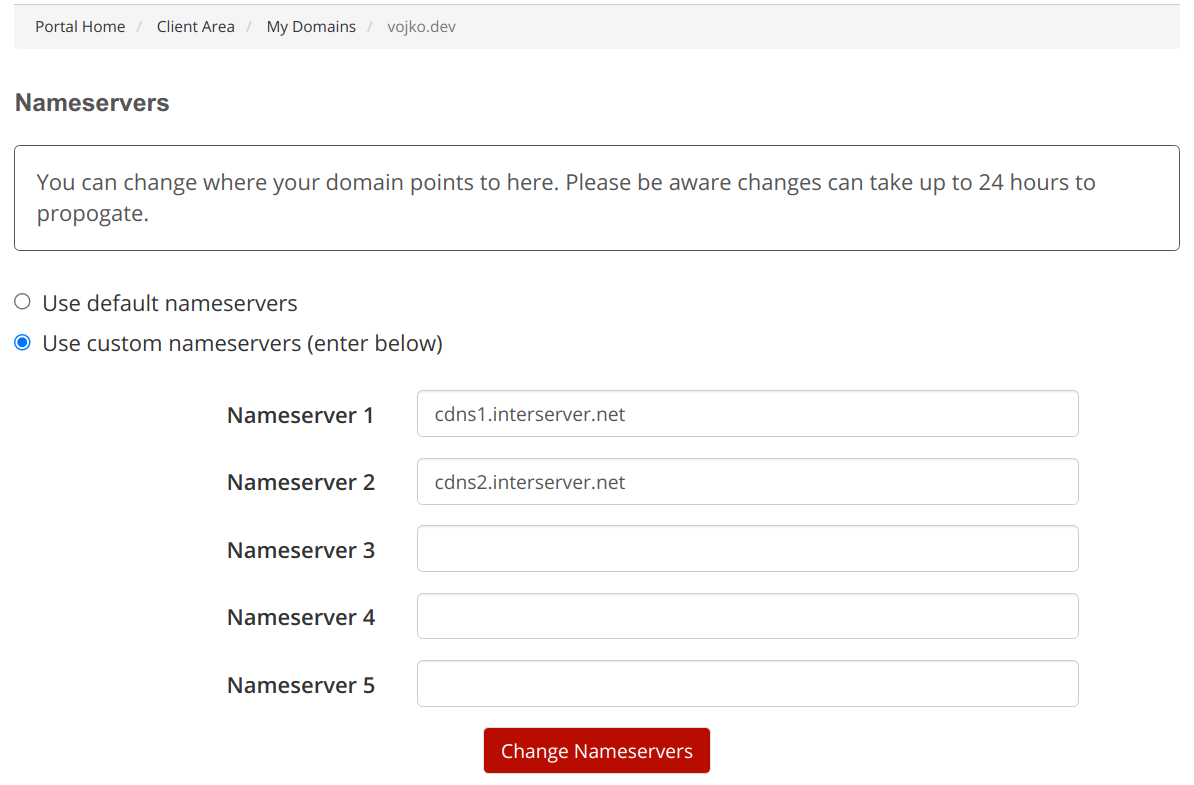 Using InterServer nameservers from the domain manager
As you can see, we instructed our domain to use InterServer nameservers to hit the domain resolver there.
Now we need to configure the DNS resolver. First login to InterServer (or whoever you picked to be your hosting provider) client area and look for your VPS there. We need to look for the public IP address.
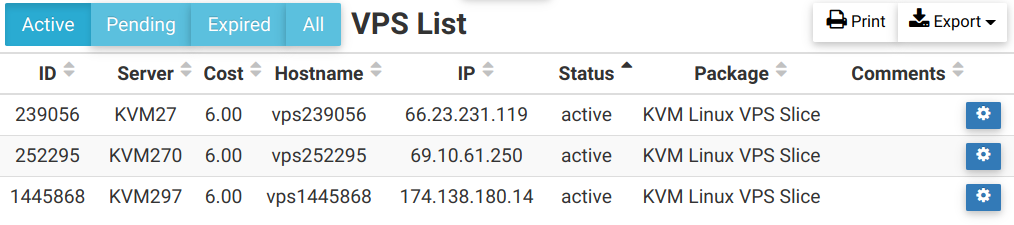 List of all available VPS servers with public IP’s
Once we have the IP address of the VPS instance we want to use, we need to instruct our DNS resolver to forward every request that comes from our domain to the target VPS’s IP address. InterServer’s DNS manager can be found in the navigation menu under More -> DNS manager. We have the option there to input our domain name and the IP address we want to forward (resolve) it to.
 DNS Manager
Once you are done, hit the Add DNS Entry button to save the changes. The tricky part here is that DNS resolvers and nameservers can take some time to propagate the changes we just made. To check the status of propagation we can use this site. Input your domain name and run the checks for A record. Once it propagates you should see a lot of green checkmarks. If not, wait for a few minutes and check again until you do.
2. Configuring your VPS
To be able to remotely log in to our VPS (via GitLab), we need to provide our root user (root user is the one you configure along with the VPS upon system installation) with his own SSH key. To do so, we first need to log in to our VPS via ssh inside the terminal/console.
ssh root@your-server-ip-address
Upon entering the command above you will be prompted to enter the root user’s password. After you log in you should see something like this:
root@vps1234567:~#
Our remote terminal is ready to take and process new commands. Now we will generate our SSH key. Enter the command:
ssh-keygen -t rsa
Generating public/private rsa key pair.
Enter file in which to save the key (/root/.ssh/id_rsa):
Enter passphrase (empty for no passphrase):
Enter same passphrase again:
Your identification has been saved in /root/.ssh/id_rsa
Your public key has been saved in /root/.ssh/id_rsa.pub
For each of these prompts, you can just press Enter to leave them blank. Along with the input above, you should also see an image-like fingerprint. So far so good. We now have private/public ssh key pair. Now let’s add our public key to authorized keys by using the command:
cat ~/.ssh/id_rsa.pub > ~/.ssh/authorized_keys
Also, we need to get our private key for later on when GitLab comes along. To get the contents of our private key, use the command:
cat ~/.ssh/id_rsa
If everything goes ok you should see terminal output containing a long list of characters like below
-----BEGIN OPENSSH PRIVATE KEY-----
...
...
...
-----END OPENSSH PRIVATE KEY-----
Copy/save it (BEGIN and END line included) as we will need it. Now that we have everything we need, it is time to create a GitLab repository that will hold our website.
3. Configuring GitLab repository
Note: This section assumes that you have basic GitLab CI/CD knowledge. If you are not familiar with it, please refer to this link.
Head over to GitLab and create a new blank project. Project name can be set to your domain name and you might want to set your project to private. Once you create your project, clone it locally to a destination of your choice using the git clone command:
git clone git@gitlab.com:your.username/repo.name.git
You have your blank repository available locally now. To get CI/CD to work, we need to configure some environment variables. To do so, go to your CI/CD settings page and hit Expand next to the Variables section. Our deployment will need 4 variables set. Configure your variables like in the picture below:
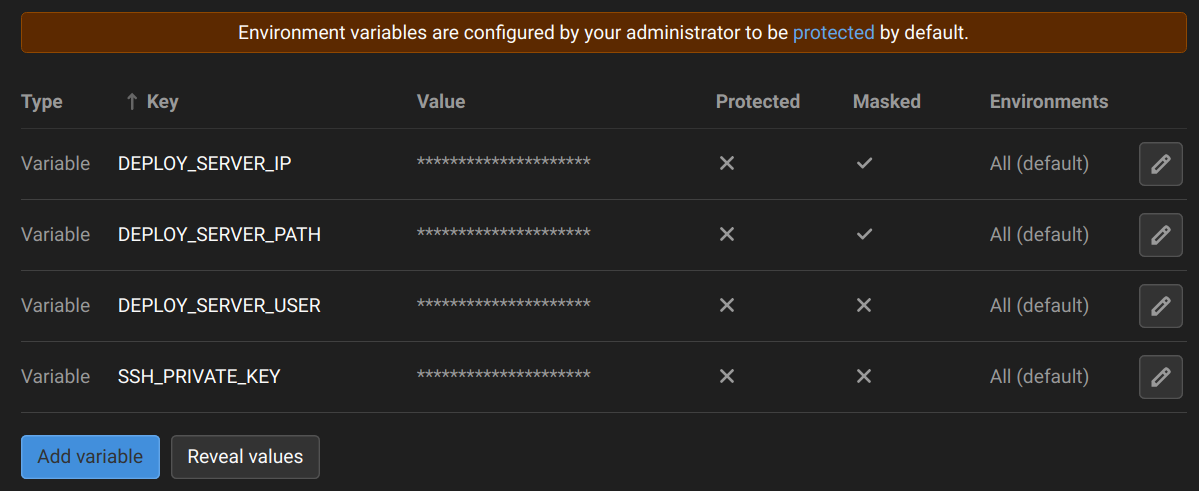 GitLab environment variables
EXAMPLE CONFIG
DEPLOY_SERVER_IP - your VPS IP address -> 12.34.567.88
DEPLOY_SERVER_PATH - website path -> /srv/docker/domain.com
DEPLOY_SERVER_USER - should be VPS default user -> root
SSH_PRIVATE_KEY - private key we saved earlier ->
-----BEGIN OPENSSH PRIVATE KEY-----
...
...
...
-----END OPENSSH PRIVATE KEY-----
Make sure to set the masked/protected checkmarks as in the above picture. Once you are done we can move on to creating our local files/folders.
4. Local files
Note: Some knowledge of Docker/docker-compose is required even tho you will be able to understand what is going on even if you don’t have any. If you want to test your website locally, you will have to install Docker and docker-compose to your host OS. If you are not interested in testing locally, skip installing Docker and docker-compose to your OS since they will only be needed on our VPS server.
Navigate to the location where you cloned your GitLab repo earlier in the guide since we will be creating our files there. This folder should be empty and/or contain only the README.md file.
To start, create an empty folder called html. Inside it create another folder called localhost if you plan to test locally (read the note above). Create another folder (also inside the html directory) called yourdomain.com (replace this with your real domain name). Create a blank file inside the yourdomain.com folder and name it index.html. If you already have your website ready, skip the creation of the blank index.html file and place your website files/folders inside instead. Now yourdomain.com should consist either of a blank index file or your website files/folders.
Next, we will create a new file in the repository root (outside the html folder). Name the file docker-compose.yml. I won’t go into details of the contents for this file because it depends on how familiar you are with docker-compose. Instead, I will just put the contents of the file below for you to copy/paste:
version: '3'

services:

  https-portal:
    image: steveltn/https-portal:1
    restart: unless-stopped
    ports:
        - 80:80
        - 443:443
    volumes:
        - ./ssl_certs:/var/lib/https-portal
        - ./html:/var/www/vhosts:rw
    environment:
        DOMAINS: 'localhost'
        STAGE: 'local'
What does this do? TLDR; This will create a localhost environment with a self-signed SSL certificate for you (HTTPS). Also, it will run a webserver on your localhost so that you can test your website (again for the requirements read the note from the start of the section) that is placed inside the html/localhost directory. If you opted not to test locally you can skip this part.
Local testing requires (as per the note below the section start) that you have Docker and docker-compose installed. While inside the repository root directory (where docker-compose.yml is), open up your terminal/console and type the following:
docker-compose up
After a while, your website should be running on your localhost web server and you should be able to access it by using your web browser. Once you get your testing done, you can use CTRL+C to stop running the webserver/docker container.
You got this far, now let’s do few more steps to get this running in production as well.
Create a new file and name it docker-compose.prod.yml inside your repository root. The contents of the new file are:
version: '3'

services:

  https-portal:
    image: steveltn/https-portal:1
    restart: unless-stopped
    ports:
        - 80:80
        - 443:443
    volumes:
        - ./ssl_certs:/var/lib/https-portal
        - ./html:/var/www/vhosts:rw
    environment:
        DOMAINS: 'yourdomain.com, www.yourdomain.com => https://yourdomain.com'
        STAGE: 'production'
Replace yourdomain.com with your actual domain. This does almost the same as the previous file but this time we are not using localhost, we are using our actual domain. Also, we are redirecting all the traffic from yourdomain.com to https://yourdomain.com.
We don’t want our localhost testing website to go to our git repository so we should also create .gitignore file:
.DS_Store
.idea/
.ssl_certs/
html/localhost/
The last file that we need to create is .gitlab-ci.yml. This is it, the big finale. This file will actually instruct GitLab on how to connect to our VPS and what to do when it does. Put the following inside the .gitlab-ci.yml file:
image: python

stages:
  - Deploy

deploy_web:
    stage: Deploy
    before_script:
        - 'which ssh-agent || ( apt-get update -y && apt-get install openssh-client -y )'
        - mkdir -p ~/.ssh
        - echo "$SSH_PRIVATE_KEY" | tr -d '\r' > ~/.ssh/id_rsa
        - chmod 600 ~/.ssh/id_rsa
        - eval "$(ssh-agent -s)"
        - ssh-add ~/.ssh/id_rsa
        - ssh-keyscan -t rsa $DEPLOY_SERVER_IP > ~/.ssh/known_hosts
        - echo -e "Host *\n\tStrictHostKeyChecking no\n\n" > ~/.ssh/config
        - chmod 644 ~/.ssh/known_hosts
    script:
        - ssh $DEPLOY_SERVER_USER@$DEPLOY_SERVER_IP "which docker || ( apt-get update -y && apt-get install docker.io -y && systemctl enable --now docker )"
        - ssh $DEPLOY_SERVER_USER@$DEPLOY_SERVER_IP "which docker-compose || ( curl -L 'https://github.com/docker/compose/releases/download/1.29.2/docker-compose-$(uname -s)-$(uname -m)' -o /usr/local/bin/docker-compose && chmod +x /usr/local/bin/docker-compose )"
        - ssh $DEPLOY_SERVER_USER@$DEPLOY_SERVER_IP "if [ ! -d "$DEPLOY_SERVER_PATH" ]; then mkdir -p $DEPLOY_SERVER_PATH; fi"
        - scp -prq $CI_PROJECT_DIR/* $DEPLOY_SERVER_USER@$DEPLOY_SERVER_IP:$DEPLOY_SERVER_PATH/
        - ssh $DEPLOY_SERVER_USER@$DEPLOY_SERVER_IP "cd $DEPLOY_SERVER_PATH && docker-compose -f docker-compose.prod.yml stop"
        - ssh $DEPLOY_SERVER_USER@$DEPLOY_SERVER_IP "cd $DEPLOY_SERVER_PATH && docker-compose -f docker-compose.prod.yml up -d"
    only:
        - master
A lot is going on here so I will try to explain in a way that you can understand even if you don’t have any idea what is going on in here.
We have a stage (Deploy) and a job inside that stage (deploy_web). Inside the job, we have 4 tags and they all do their part of the magic. Let’s analyze what each of them does:
stage: Deploy -> Our job belongs to stage called "Deploy"
before_script: -> Set of commands that will fire before the `script` tag. What we do here is configure our ssh key (private key we added to environment variables earlier in the guide) so that we can connect from GitLab to our target server.
script: -> First we make sure that our VPS target has both Docker and docker-compose installed - if not, we install both of them and run them. Then we make sure that the DEPLOY_SERVER_PATH directory tree exists - if not we must create that also. Afterward, we copy all the contents of our html/yourdomain.com directory to the VPS equivalent so that our "new version" goes live. Then we just restart docker-compose container to reflect the changes we did.
only: - master -> This will tell GitLab not to deploy anything unless the branch is master. If your branch is called main instead, please change this line to reflect it.
Our final repository structure should look something like this:
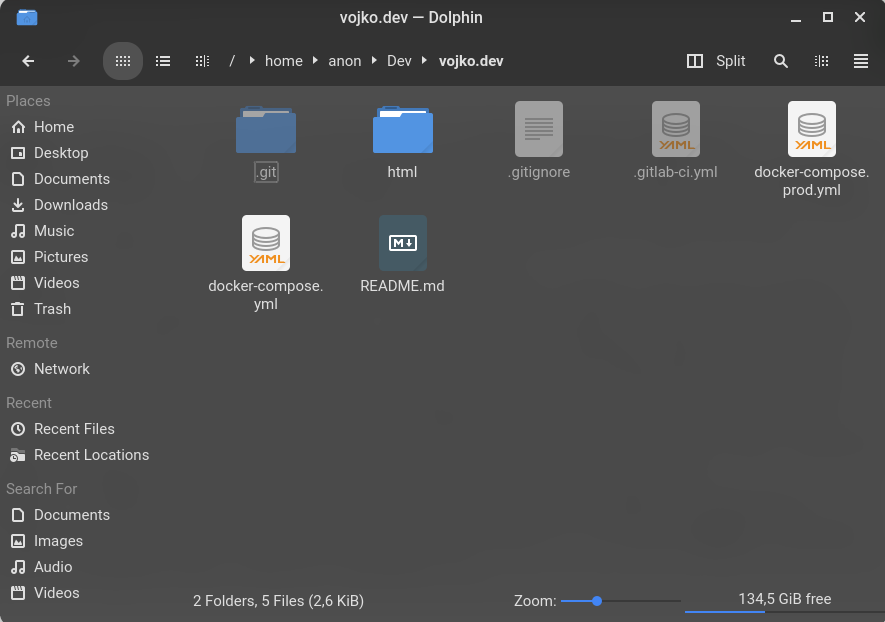 Final repo structure
The only thing that is left now is to actually push your code to the GitLab repository:
git add .
git commit -m "Init commit"
git push origin master
If you use main instead of master please correct the last line. If there are no mistakes, you should be able to see the newly created pipeline inside your repository. Once the little blue icon turns to a green checkmark, your website should be up and running. Feel free to head over to yourdomain.com and verify that everything is as it should be.
Congrats, you just deployed your website via GitLab CI/CD with the help of Docker and docker-compose.
Thanks for reading!